This tutorial provides a step-by-step guide on creating a new interview on the ZappyVue Portal.
Step 1: Log into the ZappyVue Portal.

Step 2: Navigate to the Interview tab and click on Create Interview.

Step 3: Fill in all the necessary details.
Enter the name of the interview and the designation. Specify the skills to be evaluated and the expertise level required of those skills.

You can add multiple skills by clicking on the Add button.

Adding Interview Questions
Step 1: You can add questions to an interview in multiple ways. You can create new questions, add questions from the library, or generate questions using AI.

Step 2: (More on how to add questions using the three methods, the logic behind it a bit and the concept of expected answers)
a) Create Your Own Questions:
You have the option to create your own interview questions, whether they are generic or specific. Click on "Create New Questions" to add your question. You can also provide the expected answer if desired. If you do provide an expected answer, the AI will compare the candidate's response to it.
b) Add questions from Library
These questions are pre-saved on the platform. You can search for your interview topic, find related questions in the Library, and add them to your interview.
c) Generate Questions Using AI
To generate questions using AI, ensure you have added details such as Designation, Skills, and Expertise Level. A few related questions will be displayed. If you don't find what you're looking for, click on "Generate Questions." A pop-up window will appear where you can add your suggestions as a prompt, and the questions will be generated accordingly.

Setting Interview Timings
Step 1: Choose the preparation and answering time for the candidates and click Next.
Preparation time is the duration the candidate has to prepare before answering each question. Answering time is the duration the candidate has to respond to each question.
The credit is calculated based on the number of questions added multiplied by the answering time provided to a candidate. E.g., if the no. of questions added is 3, and the answering time is 2, the credits required for interviewing each candidate would be 3X2=6.
Please see this article to learn more about Credit Calculation
(explain in one line what is the preparation time and answering time- very briefly) (Brief explanation on the credit calculation and then we need to add a link here that takes them to the credit calculation article )

Configuring Interview Settings
Step 1: In the Settings section, set the start and end date of the interview.
This indicates the duration for which the candidates can attend the interview. Once the end date has passed, the interview link will automatically expire unless you reopen the interview.

Step 2: In the Interview Feedback Analysis section, you can see Knowledge analysis where the candidates are evaluated and analysed based on their subject matter knowledge and it is enabled by default.
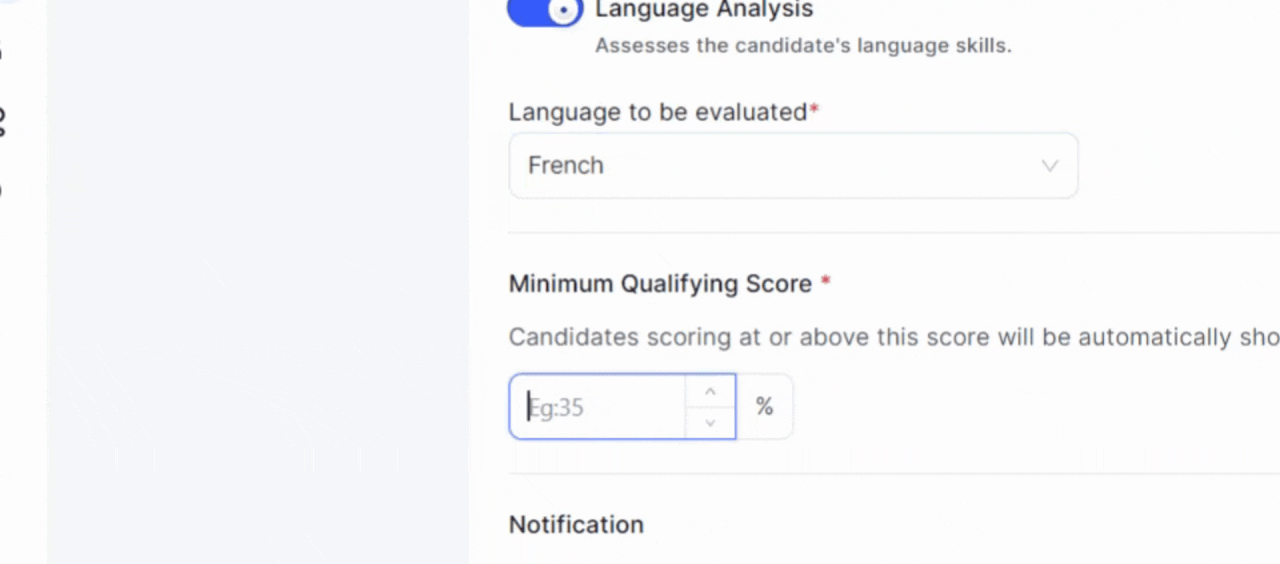
Language Analysis evaluates the candidate's proficiency in the language used during the interview. (explain what both are first, and then proceed to tell about the default On and Off etc). To analyze the candidate's language, toggle the Language Analysis bar and select the language to be evaluated. The candidates will get an instruction to attend the interview in the language you selected.

Step 3: Set the minimum qualifying score. Candidates scoring above this will be automatically shortlisted. Automatic rejection to the candidates who fail to score the cut-off. You can manually change the status if required. No notifications will be sent to the candidates. Click Next. (Can tell about the automatic rejection too, no notifications sent, can manually change the decision)
Notification
There are two types of notifications;
Email notifications to the collaborators and interview admin of the interview:
You can opt to get notifications after each candidate completes an interview and a daily report summary of the candidates of the interview.Email notifications to the candidates
You can opt to send emails containing the scores and a summary of the interview to the candidate. If this is opted, the candidate will receive and email once they have successfully completed their interview.
You can select the notifications required from the configuration tab.

Tags
This section allows a user to add tags to the interview. Tags are created to categorize and organize interviews based on common themes. This facilitates easier search and retrieval of specific interviews when needed. You can filter out interviews using tags.

Collaborators
You can add collaborators if you wish, to manage the interview. A Collaborator can’t create new interviews but can manage the interviews assigned to them. So on the Interview page, they can view the list of interviews assigned to them, invite candidates, view the progress of candidates and more.

Inviting Candidates
Step 1:
You can invite candidates in two ways;
Add the candidate names and email addresses individually.
Add candidate details in the CSV file template provided in the platform, and upload it back to invite in bulk.
If you're not ready to invite candidates yet, select Invite Later and click on Publish Interview.
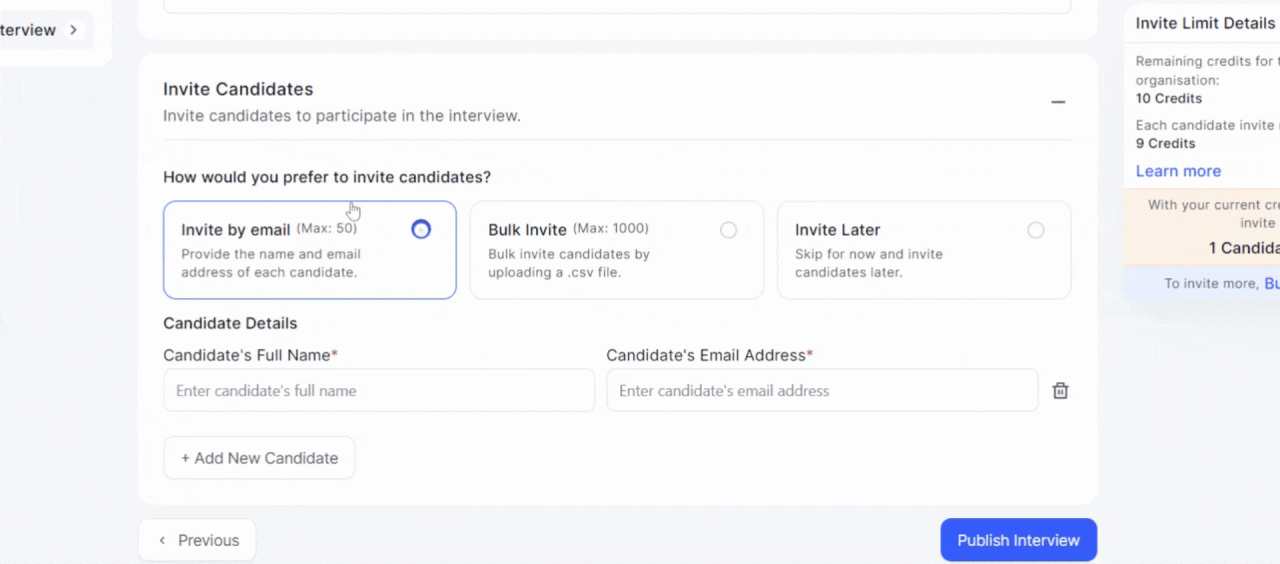
On the right side, you can see the number of candidates you can invite to this interview, with your remaining credits.
Was this article helpful?
That’s Great!
Thank you for your feedback
Sorry! We couldn't be helpful
Thank you for your feedback
Feedback sent
We appreciate your effort and will try to fix the article